CRTP,一个不正经的继承

背景

最近在写一些C++代码的时候,遇到了一些代码重复性问题,在思考如何通过模板去解决这些问题的时候,我想到了CRTP,一个不怎么正经的继承。

什么是CRTP ?

CRTP全称Curiously Recurring Template Pattern,翻译过来是「奇异递归模板模式」,是C++模板编程的一种惯用方法。这是由James Coplien在1995年提出的一项技术,它的特点是:

  1. 继承自模板类;
  2. 把派生类作为基类的模板参数;

CRPT的一般形式如下:

1
2
3
4
template <typename T>
class Base {...}

class Derived : public Base<Derived> {...};

在我有限的知识仓库里,大概没有第二种语言可以这么书写了。。。

那么问题来了,为什么要这么实现呢?为什么又可以这么实现呢?

这里通过以下代码来说明:

1
2
3
4
5
6
7
8
9
10
11
12
template <class T> 
struct Base {
void interface() {
static_cast <T*>(this)->implementation();
}
};

struct Derived : Base<Derived> {
void implementation() {
std::cout << " Derived class " << std::endl;
}
};

看到这里,估计很多同学已经在思考“现在和未来如何穿梭”的事情了,因为代码看起来很怪异,Derived看上去感觉像是在继承自己一样,而且Derived还没声明完就可以被拿来使用。。。

通常来说,基类模板可以利用“虽然成员函数很早就被声明了,但是直到其被派生类继承才会被实例化”这一事实,在基类模板的成员函数中访问派生类的方法。

在上面的代码中,Base<Derived>::interface(),虽然是在Derived之前就被声明了,但在它被实际调用之前,并不会被编译器实例化,而真正的实例化发生于Derived声明之后,此时Derived::implementation()的声明,对于Base<Derived>::interface()实现来说是已知可见的。

考虑一个没有虚函数的基类。 每当基类调用另一个成员函数时,它总是会调用自己的基类函数。 当我们从这个基类派生一个类时,我们继承了所有未被覆盖的成员变量和成员函数(没有构造函数或析构函数)。 如果派生类调用一个继承函数,然后该函数调用另一个成员函数,则该函数将永远不会调用派生类中的任何派生或重写的成员函数

但是,如果基类成员函数对所有成员函数调用使用 CRTP,则可以在编译时选择派生类中的重写函数, 这在编译时有效地模拟了虚拟函数调用系统,而没有大小或函数调用开销(VTBL 结构和方法查找、多继承 VTBL 机制)的成本,缺点是无法在运行时做出此选择,有人也称这种技术为“静态多态”。

这里有2点需要注意:

  1. 类模板是模板,类是类,这里的Base只是模板;
  2. 这里的基类是Base<Derived>,不是Base;

这里有几个触及的灵魂的问题,大家可以思考下:

  1. Base<Derived>基类中有implementation方法的实现吗?以下代码可以通过编译吗?
1
2
CRTPBase<CRTPDerived> base;
base.interface();
  1. Derived究竟是从Base<Derived>继承了什么,还是在遵循什么承诺?

CRTP 性能如何 ?

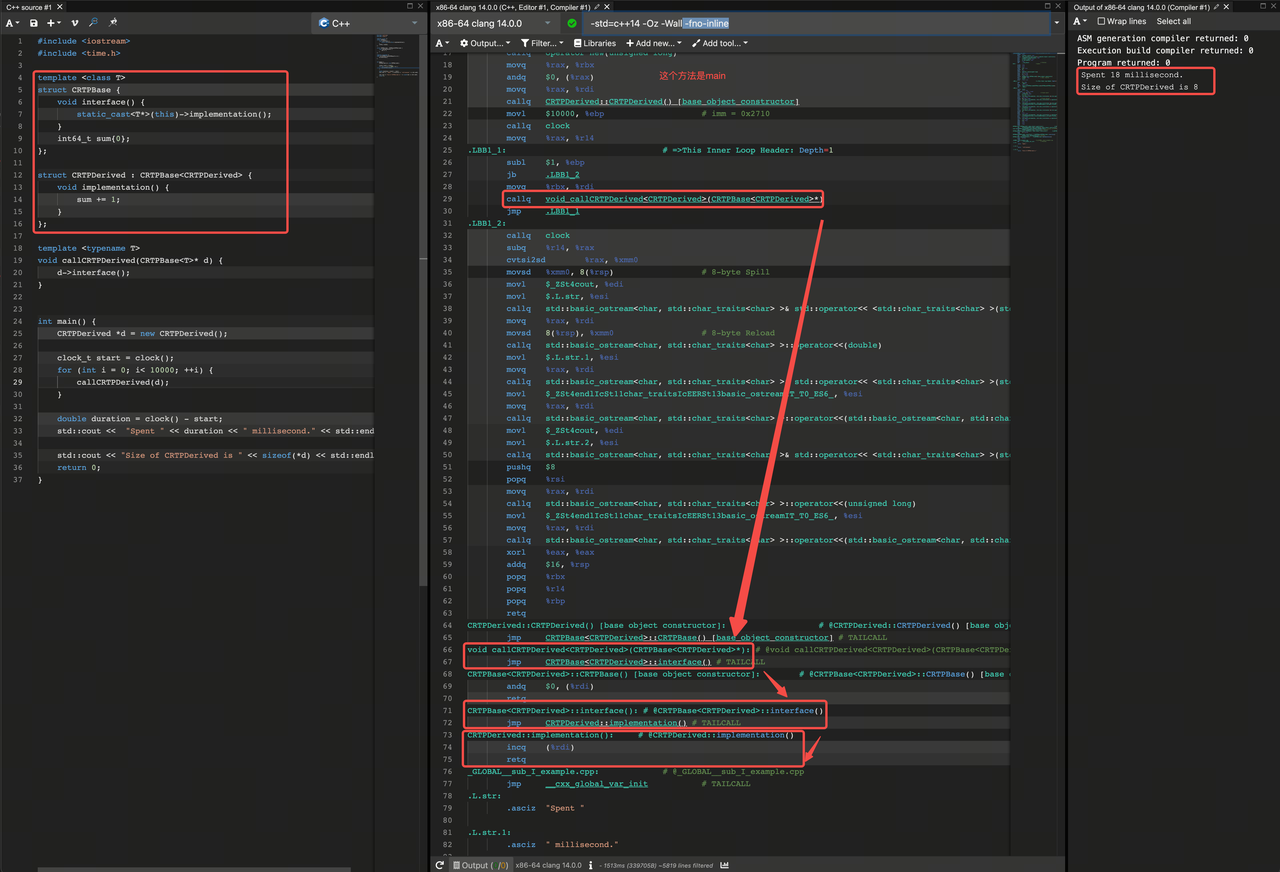
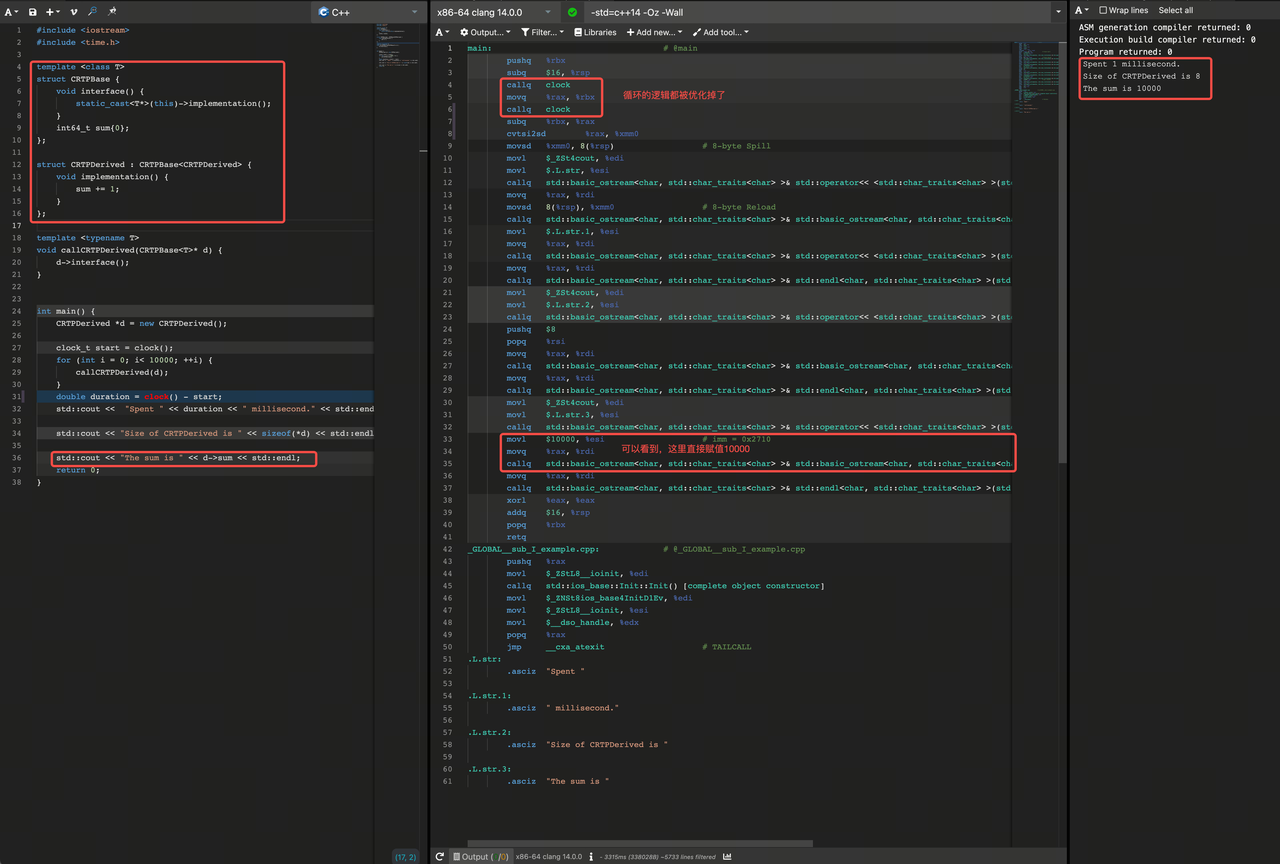
实验环境:x86-64 clang 14.0.0 -std=c++14

虚函数耗时
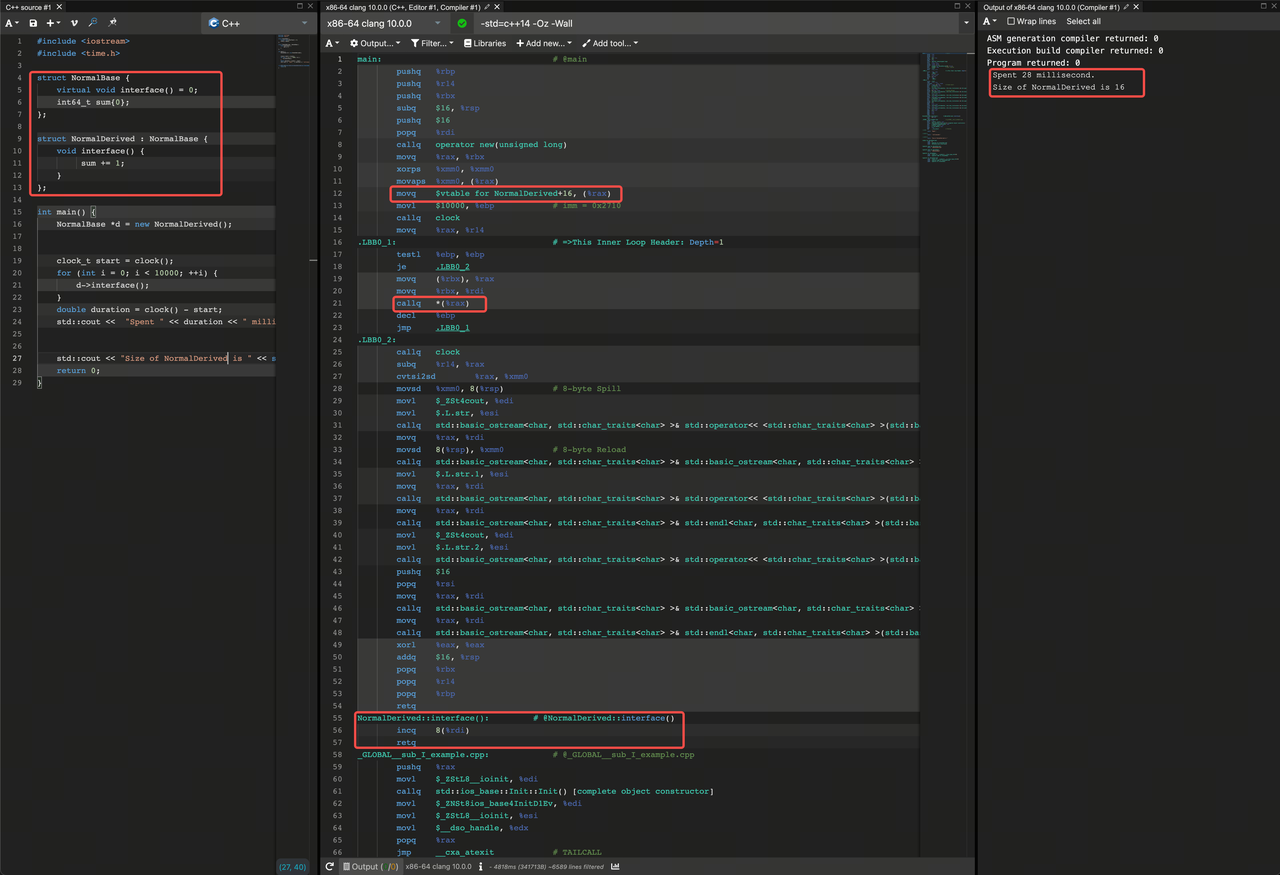
CRTP,一个不正经的继承:虚函数耗时(图 1)

CRTP耗时(禁止内联)

CRTP,一个不正经的继承:CRTP耗时(禁止内联)(图 2)

CRTP耗时(内联)

CRTP,一个不正经的继承:CRTP耗时(内联)(图 3)

指标对比

类型 虚函数 CRTP(非内联) CRTP(内联)
耗时 28ms 18ms 1ms
对象大小 16B 8B 8B

可以看到,在demo实验中,CRTP的实现方式在开启内联的情况下(一般在release下都是默认开启的),不仅速度快,而且对象占用内存小(虚函数的vptr多占8个字节)。对于一些对性能要求高的场景不妨一试。当然这里的性能对比特别简单,更专业的性能对比需要benchmark

当 CRTP 碰到设计模式

那么CRTP可以用来做些什么呢?又应该如何来应用呢?我们不妨从经典的一些设计模式讲起。话说回来,当CRTP遇上设计模式时,一些事情变得有意思起来。

单例模式

传统模式下,C++应该怎么实现单例呢?

1
2
3
4
5
6
7
8
9
10
11
12
13
class Singleton
{
private: // 注意这里是private
Singleton() { };
~Singleton() { };
Singleton(const Singleton&) = delete;
Singleton& operator=(const Singleton&) = delete;
public:
static Singleton& getInstance() {
static Singleton instance;
return instance;
}
};

C++11规定了local static在多线程条件下的初始化行为,要求编译器保证了内部静态变量的线程安全性。在C++11标准下,《Effective C++》提出了一种优雅的单例模式实现,使用函数内的 local static 对象。这样,只有当第一次访问getInstance()方法时才创建实例。这种方法也被称为Meyers' Singleton。C++0x之后该实现是线程安全的,C++0x之前仍需加锁。关于C++单例更多的实现方式在这里:https://zhuanlan.zhihu.com/p/37469260,这里不再展开。

如果另一个类也需要实现单例呢?笨办法就是把上面的代码再抄一遍,但是如果用CRTP来实现单例呢?

1
2
3
4
5
6
7
8
9
10
11
12
13
14
15
16
17
18
template <typename Derived>
class Singleton {
public :
template<typename ...Args>
static std::unique_ptr<Derived>& GetInstance(const Args& ...args) {
static std::unique_ptr<Derived> m_instance;
static std::once_flag m_flag;
std::call_once(m_flag, [](auto ...args) {
m_instance.reset(new Derived(args...));
}, args...);
return m_instance;
}
protected:
Singleton() = default;
~Singleton() = default;
private:
Singleton(Singleton&) = delete;
};

如代码所示,我们把派生类当成了模板参数,当实现单例的时候,直接调用派生类的构造函数,这里使用了:

  1. 变参模板variadic template,可以支持任意参数的传递。想想看,如果在OC里面实现1个支持任意参数的单例,是不是并不容易?
  2. std::call_once和std::once_flag,是不是和OC的dispatch_once和dispatch_once_t很像?

在这样的情况下,当任何一个类想要自己的单例的时候,只需要简单地继承Singleton,并把自己作为模板参数传入即可。

1
2
3
4
5
6
7
8
9
10
class TestService : public Singleton<TestService> {
public:
void doSomething() {
std::cout << "TestService doSomething" << std::endl;
}

private:
TestService() = default; // 注意这里需要把构造函数声明为私有
friend class Singleton<TestService>;
};
1
2
3
4
int main() {
TestService::GetInstance()->doSomething();
return 0;
}
  1. 子类需要将自己的构造函数声明为private;
  2. 子类中需要声明友元类:Singleton<TestService>

简单工厂模式

1
2
3
4
5
6
7
8
9
10
11
12
13
14
15
16
17
18
19
20
21
22
23
24
25
26
27
28
29
30
31
32
33
34
35
36
template <typename Derived, bool ThreadSafe = true>
class Factory {
public :
using WeakMap = WeakWrapper<std::map<std::string, std::unique_ptr<Derived>>>;

static StaticWrapper<WeakMap>& GetMap() {
static StaticWrapper<WeakMap> container;
return container;
}

static rwlock& GetLock() {
static rwlock *lock = new rwlock();
return *lock;
}

template <typename ...Args>
static std::unique_ptr<Derived>& GetInstance(const std::string& key, Args&& ...args) {
auto& container = GetMap();
auto& lock = GetLock();

if (ThreadSafe) lock.lock_shared();
auto safe_container = container.SafeGet();
auto map_ptr = safe_container.Lock();
auto& map = map_ptr->GetItem();
auto iter = map.find(key);
if (iter != map.end()) {
if (ThreadSafe) lock.unlock_shared();
return map[key];
}
if (ThreadSafe) lock.unlock_shared();

if (ThreadSafe) lock.lock();
map[key] = std::make_unique<Derived>(std::forward<Args>(args)...);
if (ThreadSafe) lock.unlock();
return map[key];
}

同样,想需要实现简单工厂的类只需要简单地继承自Factory,然后把自己作为模板参数传入即可。另外,这个简单工厂内部需要把对象以key-value的形式存下来,所以需要调用侧传1个key进去。

1
2
3
4
5
6
class SomeService : public  Factory <SomeService> {
public:
void doSomething();
};

SomeService::GetInstance(key, param)->doSomething();

这个代码调用起来比较难受,到处都得传1个不需要的key值。那么改造一下吧

1
2
3
4
5
6
7
8
9
10
11
12
13
14
15
16
17
18
19
20
21
22
23
template <typename ...Args>
static std::unique_ptr<Derived>& GetInstance(Args&& ...args) {
auto& container = GetMap();
auto& lock = GetLock();

auto key = DecayFirstParam(std::forward<Args>(args)...);

if (ThreadSafe) lock.lock_shared();
auto safe_container = container.SafeGet();
auto map_ptr = safe_container.Lock();
auto& map = map_ptr->GetItem();
auto iter = map.find(key);
if (iter != map.end()) {
if (ThreadSafe) lock.unlock_shared();
return map[key];
}
if (ThreadSafe) lock.unlock_shared();

if (ThreadSafe) lock.lock();
map[key] = std::make_unique<Derived>(std::forward<Args>(args)...);
if (ThreadSafe) lock.unlock();
return map[key];
}

改造的核心思想就是:要获取到第1个参数,并根据参数的类型获取最终想要的key值。这里通过DecayFirstParam获取到了参数列表中的第1个参数,这个叫参数解包(有点像萃取技术)。由于第一个参数的类型不能够确定,这里采用了std::enable_if,分别对项目中具体使用到的ModuleEnv、Env和std::string几个类型进行了方法重载处理。

1
2
3
4
5
6
7
8
9
10
11
12
13
14
15
16
17
18
template <typename T, typename ...Args>
typename std::enable_if<std::is_same<typename std::decay<T>::type, std::shared_ptr<ModuleEnv>>::value, std::string>::type
DecayFirstParam(T&& t, Args&& ...arg) {
return t->GetModuleId();
}

template <typename T, typename ...Args>
typename std::enable_if<std::is_same<typename std::decay<T>::type, std::shared_ptr<Env>>::value, std::string>::type
DecayFirstParam(T&& t, Args&& ...arg) {
return t->GetIdentify();
}

template <typename T, typename ...Args>
typename std::enable_if<std::is_same<typename std::decay<T>::type, std::string>::value, std::string>::type
DecayFirstParam(T&& t, Args&& ...arg) {
std::string copy = t;
return copy;
}

除此之外,这里还使用了万能引用和完美转发技术,但是这不是本文要讨论的内容,可以先忽略,详情可以参考:https://zhuanlan.zhihu.com/p/50816420

策略模式

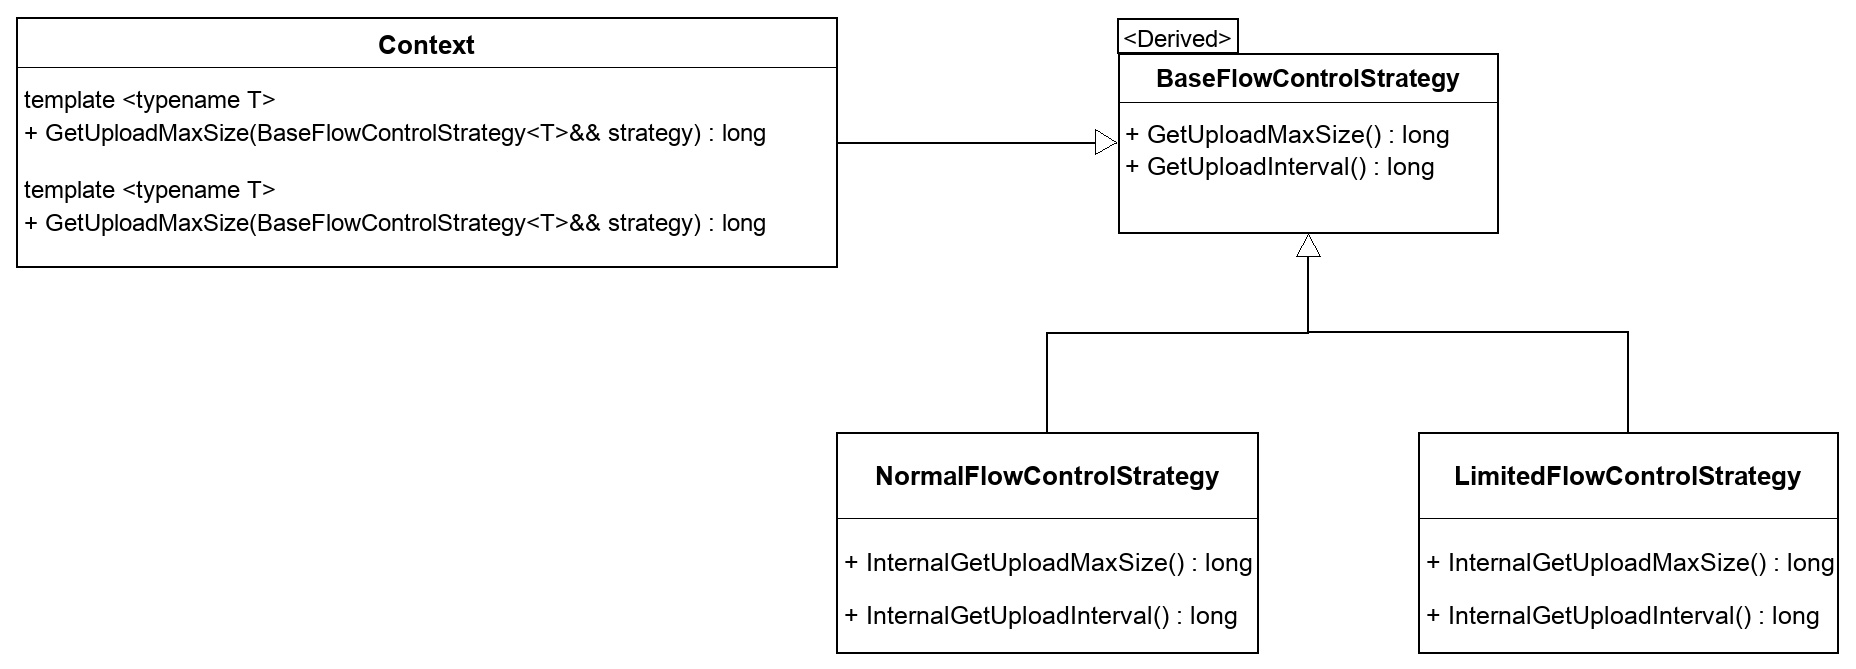
这里以一个流量控制的案例来说明:假设对流量控制需要采取2种不同的模式:正常模式和限流模式,那么传统的UML图如下图所示 CRTP,一个不正经的继承:策略模式(图 4)
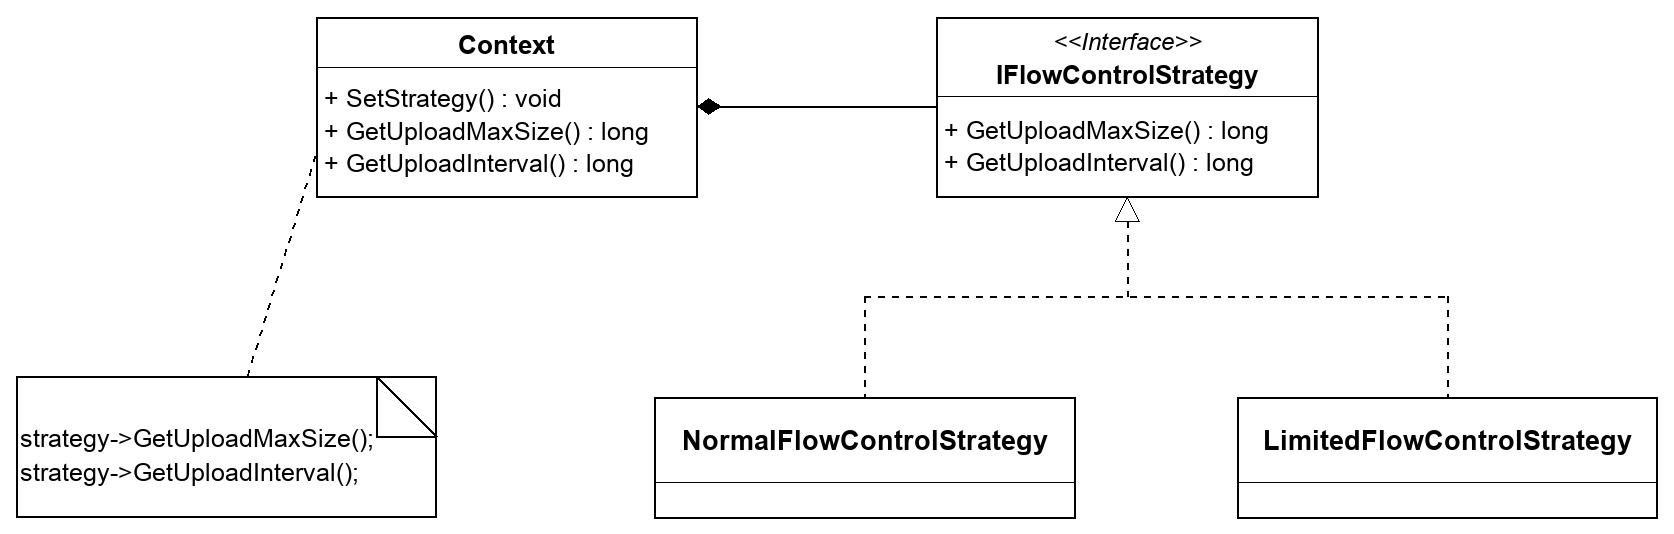
代码也很简单易懂

1
2
3
4
5
6
7
8
9
10
11
12
13
14
15
16
17
18
19
class IFlowControlStrategy {
public :
virtual ~IFlowControlStrategy() = default;
virtual long GetUploadMaxSize() = 0;
virtual long GetUploadInterval() = 0;
};

class NormalFlowControlStrategy : public IFlowControlStrategy {
public :
virtual long GetUploadMaxSize() override;
virtual long GetUploadInterval() override;
};


class LimitedFlowControlStrategy : public IFlowControlStrategy {
public :
virtual long GetUploadMaxSize() override;
virtual long GetUploadInterval() override;
};

如果使用CRTP来实现的话: CRTP,一个不正经的继承:策略模式(图 5)

  1. 先定义1个CRTP基类BaseFlowControlStrategy;
  2. 再根据2种策略定2个子类:NormalFlowControlStrategy和LimitedFlowControlStrategy;
  3. 对外的接口则是模板方法GetUploadMaxSize和GetUploadInterval。
1
2
3
4
5
6
7
8
9
10
11
12
13
14
15
16
17
18
19
20
21
22
23
24
25
26
27
28
29
30
31
32
33
34
35
36
template <class Derived>
class BaseFlowControlStrategy {
public :
long GetUploadMaxSize() {
return static_cast <Derived*>(this)->InternalGetUploadMaxSize();
}
long GetUploadInterval() {
return static_cast <Derived*>(this)->InternalGetUploadInterval();
}
};


class NormalFlowControlStrategy : public BaseFlowControlStrategy<NormalFlowControlStrategy> {
private:
friend class BaseFlowControlStrategy<NormalFlowControlStrategy>;
long InternalGetUploadMaxSize();
long InternalGetUploadInterval();
};

class LimitedFlowControlStrategy : public BaseFlowControlStrategy<LimitedFlowControlStrategy> {
private:
friend class BaseFlowControlStrategy<LimitedFlowControlStrategy>;
long InternalGetUploadMaxSize();
long InternalGetUploadInterval();
};

// API
template <class T>
long GetUploadMaxSize(BaseFlowControlStrategy<T>&& strategy) {
return strategy.GetUploadMaxSize();
}

template <class T>
long GetUploadInterval(BaseFlowControlStrategy<T>&& strategy) {
return strategy.GetUploadInterval();
}

注意这里的friend class

外侧调用

1
2
3
4
5
6
7
8
long  Context::GetUploadInterval() {
std::lock_guard<std::mutex> lock(m_strategy_mutex);
if (m_strategy_type == FlowControlStrategyTypeNormal) {
return GetUploadInterval(NormalFlowControlStrategy());
} else {
return GetUploadInterval(LimitedFlowControlStrategy());
}
}

可以发现,对外的接口是个模板方法,所以这注定了它和传统的OOP编程模式有些格格不入。

这个模式还有个别名:Policy-Based Class Design

克隆模式

当要通过基类指针获得对象的拷贝时,通常做法是加个虚的Clone函数,而用CRTP可以避免在每个派生类中重复这个函数,只要派生类允许复制构造即可

1
2
3
4
5
6
7
8
9
10
11
12
13
14
15
16
17
18
19
20
21
22
23
24
25
26
27
// Base class has a pure virtual function for cloning
class Shape {
public:
virtual ~Shape() {}
virtual Shape* Clone() const = 0;
};

// This CRTP class implements clone() for Derived
template <typename Derived>
class Shape_CRTP : public Shape {
public:
Shape* Clone() const override {
return new Derived(static_cast<Derived const&>(*this));
}
};

class Square : public Shape_CRTP<Square> {
public:
Square(Square& s);
......
};

class Circle : public Shape_CRTP<Circle> {
public:
Circle(Circle& c);
......
};

访问者模式

访问者模式本身就比较复杂,这里还要结合CRTP,所以整体会比较困难,这里借助modern c++设计模式系列(一)的例子进行说明.

假设有一个动物的继承体系,有dog, bird派生于动物基类animal,基类的纯虚函数是move。随着需求的变化,我们给dog添加了swim,给bird添加了fly方法。因为dog是不能fly的,bird是不能swim的,所以这2个方法不能放到基类animal中。

1
2
3
4
5
6
7
8
9
10
11
12
13
14
15
16
17
18
19
20
21
22
struct animal{
virtual int move()=0;
virtual ~animal() = default;
};

struct dog : public animal{
int move() override {
return 4;
}
void swim(){
std::cout<<"swim"<<std::endl;
}
};

struct bird : public animal{
int move() override {
return 2;
}
void fly(){
std::cout<<"fly"<<std::endl;
}
};

那么现在需要通过animal对象来调用swim和fly方法,怎么做?

Downcasting

很常见的办法就是downcasting。 CRTP,一个不正经的继承:Downcasting(图 6)
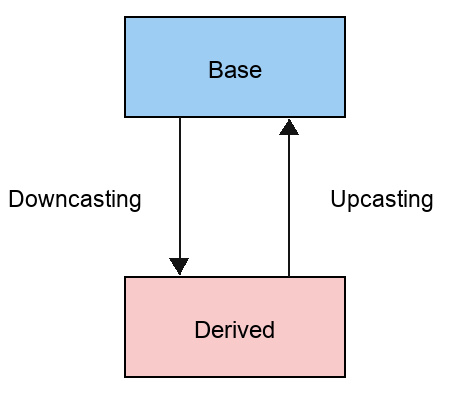
1
2
3
4
5
6
7
void test(animal* anim) {
if(dynamic_cast<dog*>(anim)){
static_cast<dog*>(anim)->swim();
}else if(dynamic_cast<bird*>(anim)){
static_cast<bird*>(anim)->fly();
}
}

相信大部分人都见过类似的代码,甚至也写过这样的代码,包括我自己,但是这种写法的确会很糟糕:

  1. 随着需求的变化,这里的if-else会愈来愈膨胀;
  2. dynamic_cast很低效,应该尽量避免;

visitor模式上场

这个时候轮到visitor模式上场了:visitor模式可以在不修改被访问对象的情况下,添加新的访问行为,通过visitor模式我们可以消除之前的 dynamic_cast了

1
2
3
4
5
6
7
8
9
10
11
12
13
14
15
16
17
18
19
20
21
22
23
24
25
26
27
28
29
30
31
32
33
34
35
36
37
38
39
40
41
42
43
44
45
46
47
48
49
50
51
52
53
54
55
56
57
58
struct visitor{
virtual void visit(dog*)=0;
virtual void visit(bird*)=0;
};

struct animal{
virtual int move()=0;
virtual void accept(visitor*) = 0;
virtual ~animal() = default;
};

struct dog : public animal{
int move() override {
return 4;
}

void accept(visitor* v){
v->visit(this);
}

void swim(){
std::cout<<"swim"<<std::endl;
}
};

struct bird : public animal{
int move() override {
return 2;
}

void accept(visitor* v){
v->visit(this);
}

void fly(){
std::cout<<"fly"<<std::endl;
}
};

struct visitor_impl : public visitor{
void visit(dog* d) override{
d->swim();
}

void visit(bird* b) override{
b->fly();
}
};

int main() {
visitor* v = new visitor_impl;

animal* a = new dog;
a->accept(v);

animal* b = new bird;
b->accept(v);
}

这是经典的visitor模式的实现,对于被访问者继承体系animal体系来说,访问animal的方式可以通过visitor自由增加了,而animal体系是不会感知到的,换句话说,在不修改被访问者的前提下,你可以给被访问者添加新的访问行为,这很棒。

这也是一个经典的双分派的visitor模式,所谓双分派就是两次分派,有两次虚函数调用:

  1. 第一次虚函数调用是animal::accept纯虚方法的调用;
  2. 第二次虚函数调用是visitor::visit纯虚方法的调用。

CRTP介入

有没有看到1个令人讨厌的方法?对,就是accept,dog和bird都写了一遍,且一模一样。我们来照着前面的克隆模式,消除下这个重复方法:把accept挪动到继承自animal的visitable中,其它的派生类从现在开始不再直接继承animal,而是继承visitable

1
2
3
4
5
6
7
8
9
10
11
12
13
14
15
//crtp
template<typename T>
struct visitable : public animal{
void accept(visitor* v) override {
v->visit(static_cast<T*>(this));
}
};

struct dog : public visitable<dog>{
...
};

struct bird : public visitable<bird>{
...
};

瞬间感觉派生类清爽了很多,有没有?

魔法来了

如果此时再添加1个子类fish,那么vistor基类就得新增1个虚函数,那么之前的派生类都得修改,所以这段代码是不稳定的,也违反了开闭原则。问题的原因是animal依赖了visitor,visitor又依赖了具体的animal类型。SOLID原则时刻告诫我们,要依赖抽象,不应该依赖具体。

所以可以把visitor定义为1个模板类,这样animal就依赖了1个泛型类型,而不是具体的类型。考虑到模板的传染性,为了避免animal也得模板化,这里又引入了visitor_token基类,可以看到visitor_token就是一个辅助基类,里面除了默认的虚析构函数,啥都没有,但是这已经足够了。

1
2
3
4
5
6
7
8
9
10
11
12
13
14
15
16
17
18
19
20
21
22
23
24
25
26
27
28
29
30
31
32
33
34
35
36
37
38
39
40
41
42
43
44
45
46
47
48
49
50
51
52
53
54
55
56
57
58
59
60
61
62
63
64
65
66
67
68
69
70
71
72
73
74
75
76
77
78
79
80
81
82
83
84
85
86
87
88
89
90
91
92
template<typename T>
struct visitor {
virtual void visit(T*) = 0;
};


struct visitor_token{
virtual ~visitor_token() = default;
};

struct animal{
virtual int move()=0;
virtual void accept(visitor_token*) = 0;
virtual ~animal() = default;
};

template<typename T>
struct visitable : public animal {
void accept(visitor_token* v) override {
if(auto p = dynamic_cast<visitor<T>*>(v); p){
p->visit(static_cast<T*>(this));
}
}
};

struct dog : public visitable<dog>{
int move() override {
return 4;
}

void swim(){
std::cout<<"swim"<<std::endl;
}
};

struct bird : public visitable<bird>{
int move() override {
return 2;
}

void fly(){
std::cout<<"fly"<<std::endl;
}
};

struct fish : public visitable<fish> {
int move() override {
return 1;
}

void dive(){
std::cout<<"dive"<<std::endl;
}
};

template <class... T>
struct MultipleVisitor : public visitor_token, public visitor<T>... {
};

using MyVisitor = MultipleVisitor<dog, bird>;
using MyVisitor1 = MultipleVisitor<fish>;

struct visitor_impl : public MyVisitor{
void visit(dog* d) override{
d->swim();
}
void visit(bird* b) override{
b->fly();
}
};

struct visitor_impl1 : public MyVisitor1{
void visit(fish* f) override{
f->dive();
}
};

int main()
{
visitor_token* v = new visitor_impl;

animal* a = new dog;
a->accept(v);

animal* b = new bird;
b->accept(v);

visitor_token* v1 = new visitor_impl1;

animal* c = new fish;
c->accept(v1);
}

到此时,visitor和animal都不再依赖具体,而是依赖于抽象,从而达到了解耦的目的。

本次修改最大的魔法来自于:MultipleVisitor利用Using-declaration来自动生成一个访问者的继承体系,而不是像之前一样,一个一个定义visitor派生类了,这样对代码做了简化,也可以很方便地定义新的访问者体系了,只要定义一个新类型就行了。

这里可能稍微有些费解,这里不妨把using MyVisitor = MultipleVisitor<dog, bird>的等价代码展开:

1
2
3
4
5
6
7
8
9
10
11
12
13
14
15
// 1. 先把2个接口类特化
template<>
struct visitor<dog> {
virtual void visit(dog*) = 0;
};
template<>
struct visitor<bird> {
virtual void visit(bird*) = 0;
}

// 2. 展开继承
struct `MyVisitor` : public visitor_token, public visitor<dog>, public visitor<bird> {
virtual void visit(dog*) = 0;
virtual void visit(bird*) = 0;
};

可以看到1行代码替代了15行代码的工作,可以体会下模板的魅力!

问题

到此为止,有没有发现有什么问题?

  1. 最终的方案并没有彻底消除dynamic_cast,可以看到accept里面仍然在使用dynamic_cast
1
2
3
4
5
6
7
8
template<typename T>
struct visitable : public animal {
void accept(visitor_token* v) override {
if(auto p = dynamic_cast<visitor<T>*>(v); p){
p->visit(static_cast<T*>(this));
}
}
};
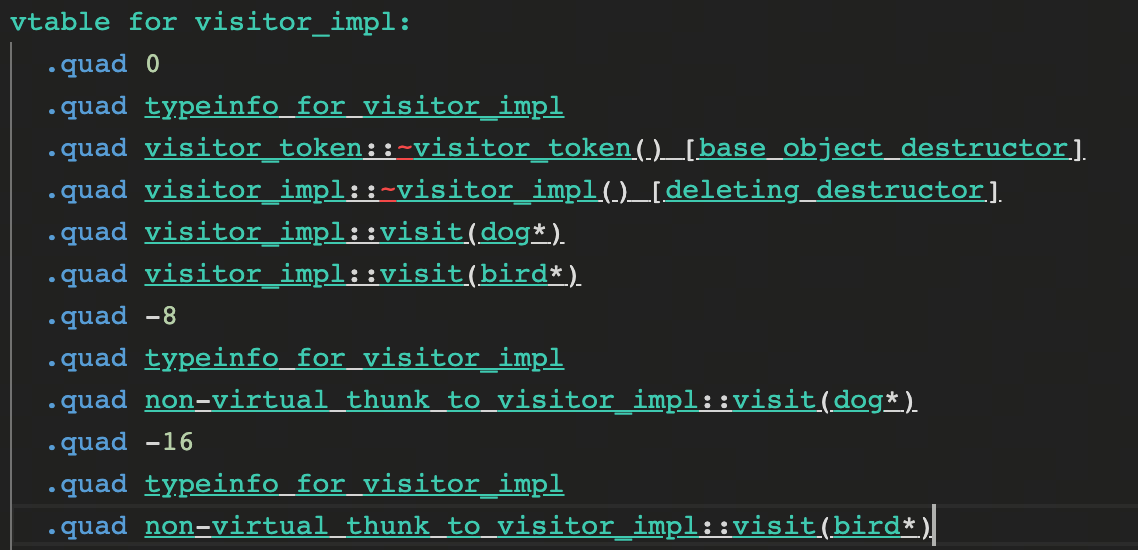
  1. 代码还在持续使用虚函数表和虚函数指针,可以看下visitor_impl的虚函数表

CRTP,一个不正经的继承:问题(图 7)

可以发现,最终的“优雅代码”离我们最初设定的目标还是有一定的偏移,但是鱼和熊掌不可兼得,总得做一些tradeoff,但是这些tradeoff是值得我们付出的。

CRTP 实际应用

std::enable_shared_from_this

1
2
3
4
5
6
7
8
9
10
11
12
13
14
15
16
17
18
template<class _Tp>
class enable_shared_from_this
{
mutable weak_ptr<_Tp> __weak_this_;
protected:
enable_shared_from_this() _NOEXCEPT {}
enable_shared_from_this(enable_shared_from_this const&) _NOEXCEPT {}
enable_shared_from_this& **operator**=(enable_shared_from_this const&) _NOEXCEPT
{return *this;}
~enable_shared_from_this() {}
public :
shared_ptr<_Tp> shared_from_this()
{return shared_ptr<_Tp>(__weak_this_);}
shared_ptr<_Tp const> shared_from_this() const
{return shared_ptr<const _Tp>(__weak_this_);}

template <class _Up> friend class shared_ptr;
};

在使用智能指针的情况下,如果想使用this的智能指针,必须要按照Good的方式去实现:继承自std::enable_shared_from_this,并把自己作为模板参数。

1
2
3
4
5
6
7
8
9
10
11
12
13
// correct 
struct Good: std::enable_shared_from_this<Good> {
std::shared_ptr<Good> getptr() {
return shared_from_this();
}
};

// wrong
struct Bad {
std::shared_ptr<Bad> getptr() {
return std::shared_ptr<Bad>(this);
}
};

Clickhouse

https://github.com/ClickHouse/ClickHouse/blob/master/src/AggregateFunctions/IAggregateFunction.h

1
2
3
4
5
6
7
8
9
10
11
12
13
14
15
16
17
class IAggregateFunction : public std::enable_shared_from_this<IAggregateFunction>
{
public:
IAggregateFunction(const DataTypes & argument_types_, const Array & parameters_)
: argument_types(argument_types_), parameters(parameters_) {}

/// Get main function name.
virtual String getName() const = 0;

/// Get the result type.
virtual DataTypePtr getReturnType() const = 0;

/// Get the data type of internal state. By default it is AggregateFunction(name(params), argument_types...).
virtual DataTypePtr getStateType() const;

......
}
1
2
3
4
5
6
7
8
9
10
11
12
13
14
15
16
17
18
/// Implement method to obtain an address of 'add' function.
template <typename Derived>
class IAggregateFunctionHelper : public IAggregateFunction
{
private:
static void addFree(const IAggregateFunction * that, AggregateDataPtr place, const IColumn ** columns, size_t row_num, Arena * arena)
{
static_cast<const Derived &>(*that).add(place, columns, row_num, arena);
}

public:
IAggregateFunctionHelper(const DataTypes & argument_types_, const Array & parameters_)
: IAggregateFunction(argument_types_, parameters_) {}

AddFunc getAddressOfAddFunction() const override { return &addFree; }

......
}
1
2
3
4
5
6
7
8
9
10
11
12
13
14
15
16
17
18
/// Implements several methods for manipulation with data. T - type of structure with data for aggregation.
template <typename T, typename Derived>
class IAggregateFunctionDataHelper : public IAggregateFunctionHelper<Derived>
{
protected:
using Data = T;

static Data & data(AggregateDataPtr __restrict place) { return *reinterpret_cast<Data *>(place); }
static const Data & data(ConstAggregateDataPtr __restrict place) { return *reinterpret_cast<const Data *>(place); }

public:
// Derived class can `override` this to flag that DateTime64 is not supported.
static constexpr bool DateTime64Supported = true;

IAggregateFunctionDataHelper(const DataTypes & argument_types_, const Array & parameters_)
: IAggregateFunctionHelper<Derived>(argument_types_, parameters_) {}
......
}
1
2
3
4
5
6
7
8
9
10
11
12
13
14
/// Simply count number of calls.
class AggregateFunctionCount final : public IAggregateFunctionDataHelper<AggregateFunctionCountData, AggregateFunctionCount>
{
public:
explicit AggregateFunctionCount(const DataTypes & argument_types_) : IAggregateFunctionDataHelper(argument_types_, {}) {}

String getName() const override { return "count"; }

DataTypePtr getReturnType() const override
{
return std::make_shared<DataTypeUInt64>();
}
......
}

总结

本文主要讨论了:

  1. CRTP的概念
  2. 和虚函数做了性能对比
  3. 通过若干设计模式讲了一些具体的用法
  4. 实际应用举例

不难发现:

  • CRTP的优点:性能高、代码复用程度高,比单继承容易拓展(CRTP+多继承)
  • CRTP的缺点:理解起来比较晦涩,和传统的OOP编程有些格格不入,使用模板,传染性强。

后记:CRTP的幽灵兄弟

1995年的CRTP“这杯陈酿”是不是品的如痴如醉?

此时,不妨来看看CRTP的幽灵兄弟,Mixin。 Mixin 是一种将若干功能独立的类通过继承的方式实现模块复用的 C++ 模板编程技巧。其基本做法是将模板参数作为派生类的基类:

1
2
3
4
5
template<typename... Mixins>
class MixinClass : public Mixins... {
public:
MixinClass() : Mixins...() {}
};

这里以Point举个示例:传统方式下,如果要扩展,一般以Point为基类,派生出LabelPoint,ColorPoint,LabelColorPoint等子类。可以看到LabelColorPoint用到了菱形继承,必须使用虚继承方式

1
2
3
4
5
6
7
8
9
10
11
12
13
14
15
16
17
18
struct Point {
double x;
double y;
};

struct LabelPoint : Point {
std::string label;
};

struct ColorPoint : Point {
unsigned char red;
unsigned green;
unsigned blue;
};

struct LabelColorPoint : virtual LabelPoint, virtual ColorPoint {

};

而Mixin方式则是将Label、Color定义为不同的类,最后通过组合的方式形成LabelColorPoint类,像搭积木一样,完成功能复用。

1
2
3
4
5
6
7
8
9
10
11
12
13
14
15
16
17
18
19
template <typename... Mixins>
struct Point : public Mixins... {
double x, y;
Point() : Mixins()..., x(0.0), y(0.0) {}
Point(double x, double y) : Mixins()..., x(x), y(y) {}
};

struct Label {
Label() : label("") {}
std::string label;
};

struct Color {
unsigned char red;
unsigned green;
unsigned blue;
};

using LabelColorPoint = Point<Label, Color>;
1
2
3
4
5
int main() {
LabelColorPoint lcp;
std::cout << lcp.x << lcp.label << lcp.red << std::endl;
return 0;
}

之所以称Mixin为CRTP的幽灵,主要是因为二者的继承从形式上看正好是相反的:

  1. CRTP是把派生类作为模板参数,并且基类模板内部调用子类的功能;
  2. Mixin则是把基类作为模板参数,通过“组合的继承方式”,派生类模板内部调用基类的功能;

参考文档

  1. https://en.wikipedia.org/wiki/Curiously_recurring_template_pattern
  2. https://eli.thegreenplace.net/2013/12/05/the-cost-of-dynamic-virtual-calls-vs-static-crtp-dispatch-in-c/
  3. https://zhuanlan.zhihu.com/p/50816420
  4. http://ot-note.logdown.com/posts/805904/wtl-atl-cwindoesimp-composition-notebook
  5. https://siddswork.com/cpp-design-pattern-policy-based-class
  6. https://zhuanlan.zhihu.com/p/460825741
-------------本文结束 感谢您的阅读-------------
坚持原创技术分享,您的支持将鼓励我继续创作!

本文标题:CRTP,一个不正经的继承

文章作者:lingyun

发布时间:2022年06月24日 - 01:06

最后更新:2026年09月13日 - 10:09

原始链接:https://tsuijunxi.github.io/2022/06/24/CRTP%EF%BC%8C%E4%B8%80%E4%B8%AA%E4%B8%8D%E6%AD%A3%E7%BB%8F%E7%9A%84%E7%BB%A7%E6%89%BF/

许可协议: 署名-非商业性使用-禁止演绎 4.0 国际 转载请保留原文链接及作者。